Would you like to sell tickets for events you create on your website? Sugar Calendar Events lets you accept payments for events created on your website.
This guide will help you set up and use the Ticketing feature in Sugar Calendar Events.
In This Article
Requirements: You’ll need Sugar Calendar version 3.1.0 or higher to access Event Ticketing with Sugar Calendar Lite.
Before getting started, you’ll need to install and activate the Sugar Calendar Lite plugin on your WordPress site.
Connecting Stripe to Your Site
Note: There’s a 3% fee for every transaction along with Stripe charges if you’re using Stripe with Sugar Calendar Lite. To remove the additional 3% charge, you’ll need to upgrade to Sugar Calendar Plus license or higher.
To process payments for your event tickets, you’ll need to connect your Stripe account. Sugar Calendar uses Stripe payment gateways to allow your users to securely purchase tickets using their credit cards.
After installing the plugin, go to Sugar Calendar » Settings from your WordPress admin area. Then select the Payments tab.

If you’d like to adjust the currency your site uses, go ahead and select the option you need from the Currency dropdown before proceeding.

When you’re ready, scroll down to the Stripe section. Here, click the Connect with Stripe button.

Note: Test and Live modes must be connected separately. If you’re currently using Test Mode, please be sure to repeat this connection process with the Test Mode option set to the OFF position when you’re ready to start selling tickets to your users.
Next, you’ll be asked to authorize the connection between Sugar Calendar and Stripe. The exact content you see on this page will vary based on whether your Stripe account is already activated.

Once you’ve followed all the steps in the Stripe Connect wizard, you’ll be redirected back to your site’s admin area with a confirmation message next to Connection Status.

Enabling Tickets Sales for Events
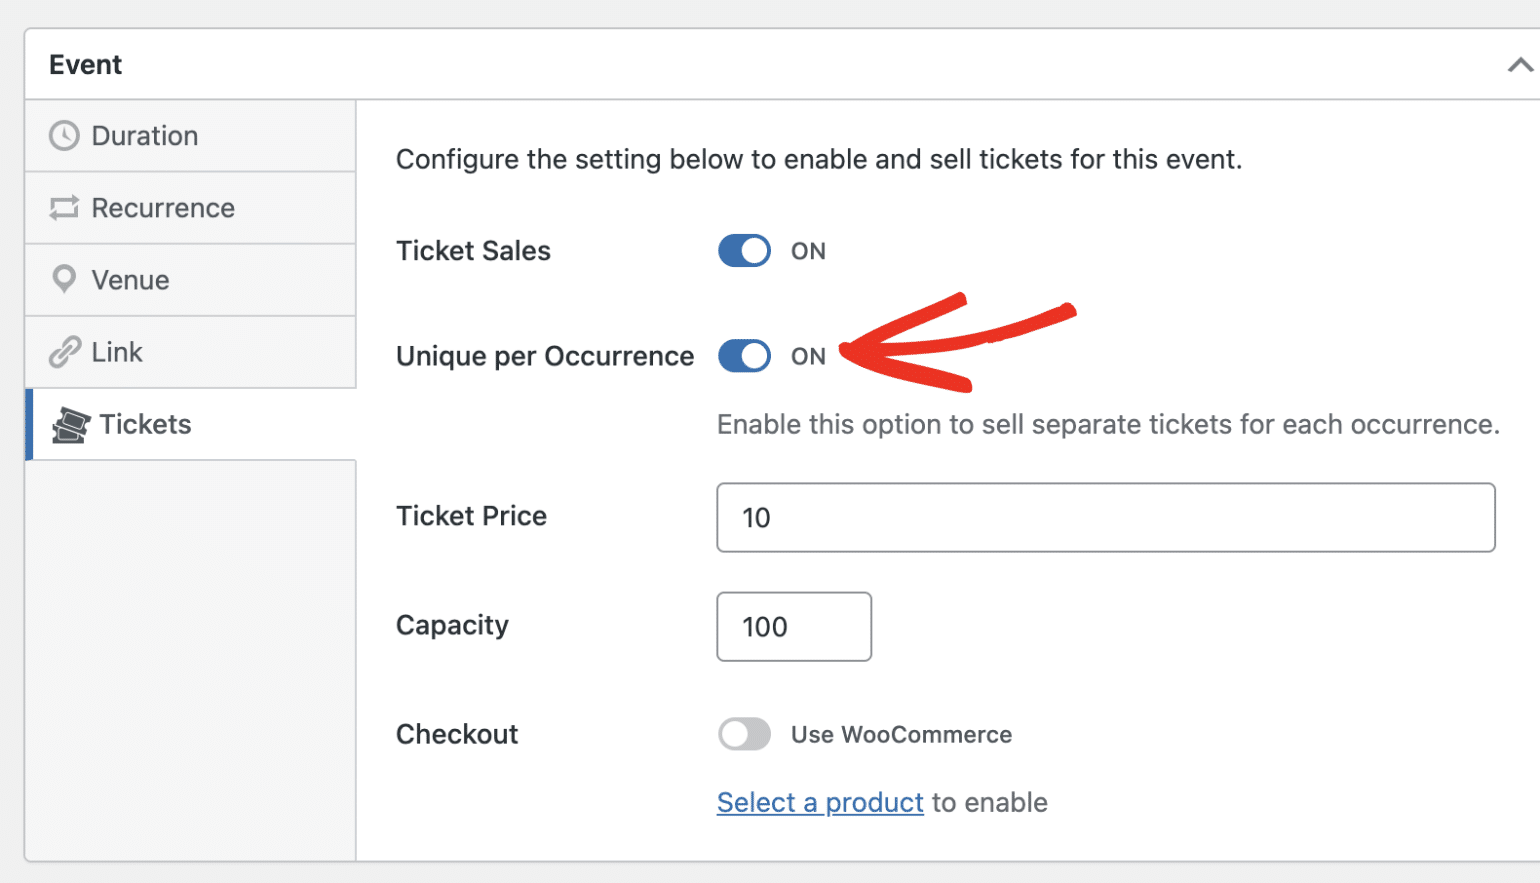
To enable tickets for an event, create a new event or edit an existing one to access the event editor. Once here, select the Tickets tab from the Event section.

After that, toggle the Ticket Sales option to the ON position. Then set the ticket price and quantity available in the Ticket Price and Capacity fields, respectively.

If the event is a recurring event, you’ll be able to accept ticket sales for each recurrence. For this, toggle the Unique per Occurrence option to the ON position.
After adding the ticket details, be sure to save or update the event page. This will add a purchase option to the bottom of the event details page, allowing attendees to buy tickets directly from your site.
Frequently Asked Questions
Below, we’ve answered some of the top questions we see about using the Event Ticketing addon with Sugar Calendar.
Can I test ticket sales for my events?
Yes! Our event ticketing system includes a test mode that lets you accept trial transactions for ticket sales. To use this feature, you’ll need to enable Stripe Test Mode on the Sugar Calendar payment settings page. Please see our tutorial to learn more about testing event ticketing.
That’s it! You now know how to set up event ticketing in Sugar Calendar to enable you to sell tickets for events on your site.
Next, would you like to learn more about managing ticket sales on your site? Be sure to check our tutorial on managing ticket orders to learn how.