Would you like to ask your attendees a few questions when they sign up for one of your events? A name and an email address cover the basics, but meal choices, T-shirt sizes, and accessibility needs are the details that decide whether the day runs smoothly.
In this tutorial, we’ll show you how to create a registration form for your events in Sugar Calendar.
In This Article
Requirements: To create a registration form, you’ll need Sugar Calendar 3.13 or higher and a Basic license or higher.
Before you get started, make sure to install and activate Sugar Calendar Events on your site and verify your license.
Enabling the Registration Form
To build a form, create a new event or edit an existing one to access the event editor.
Once there, scroll to the Sugar Calendar Event Settings panel and click the Registration Form tab in the list on the left.
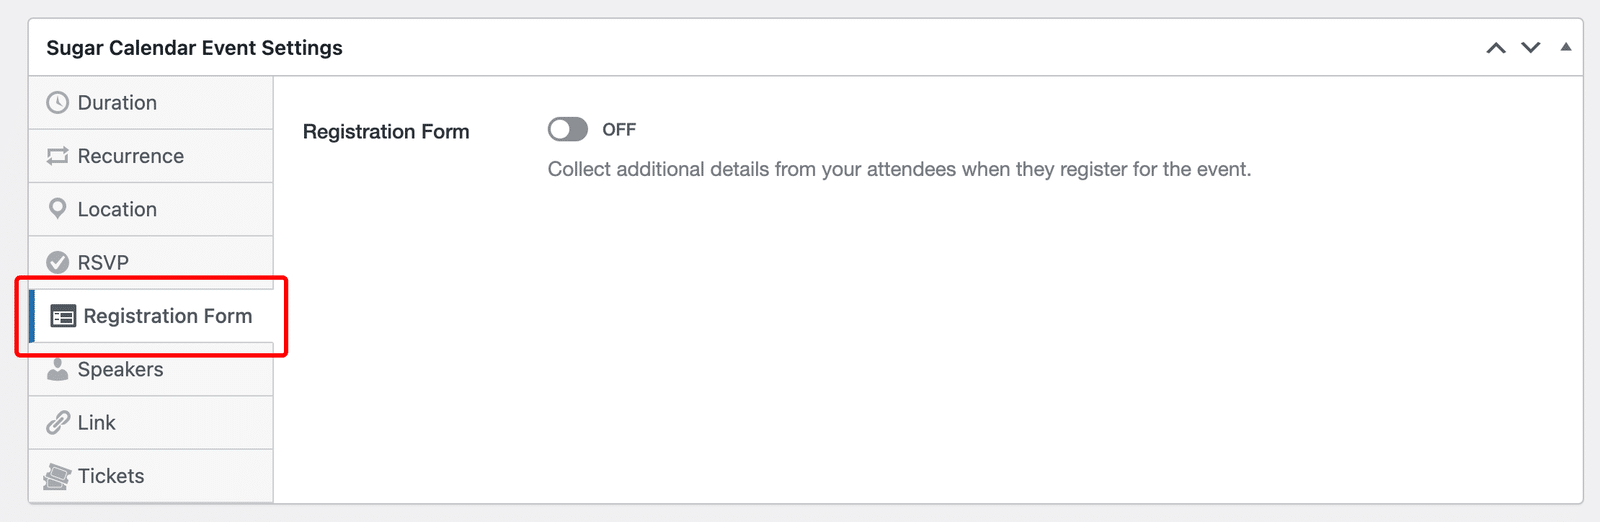
Next, toggle the Registration Form option to the ON position.
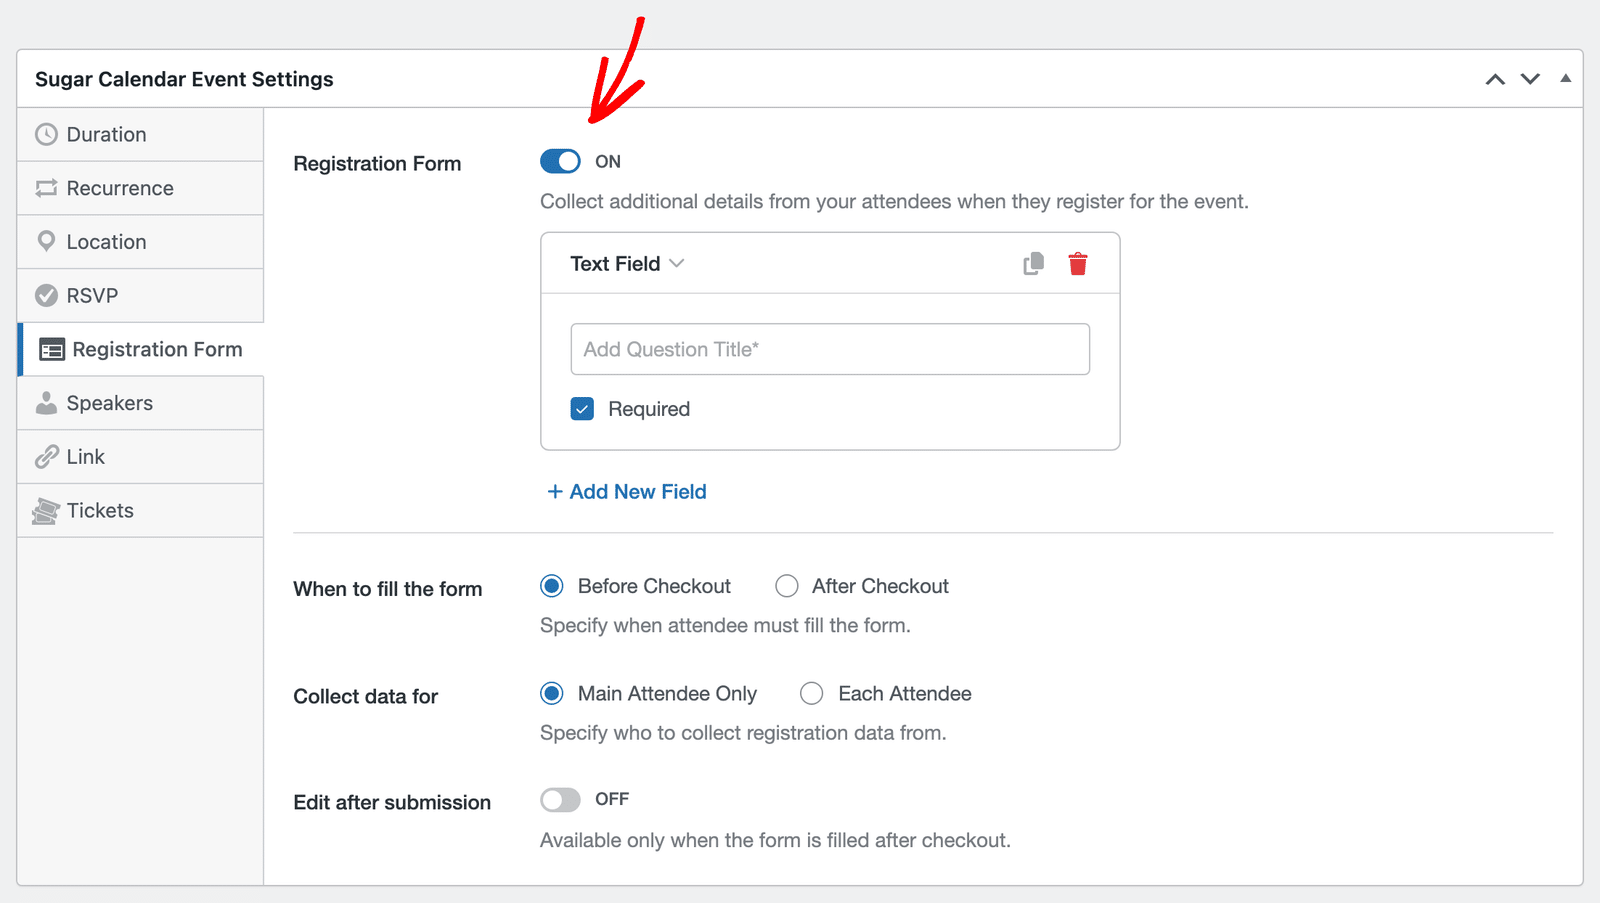
Sugar Calendar adds an empty Text Field for your first question, and a second group of settings appears below a divider.
Building Your Form
Each question in your form is a field block. The block header holds the field type, and the body holds the question title, any answer options, and the Required setting.
Choosing a Field Type
Click the field type at the top left of a block to open the type list, then pick the type that fits the question.
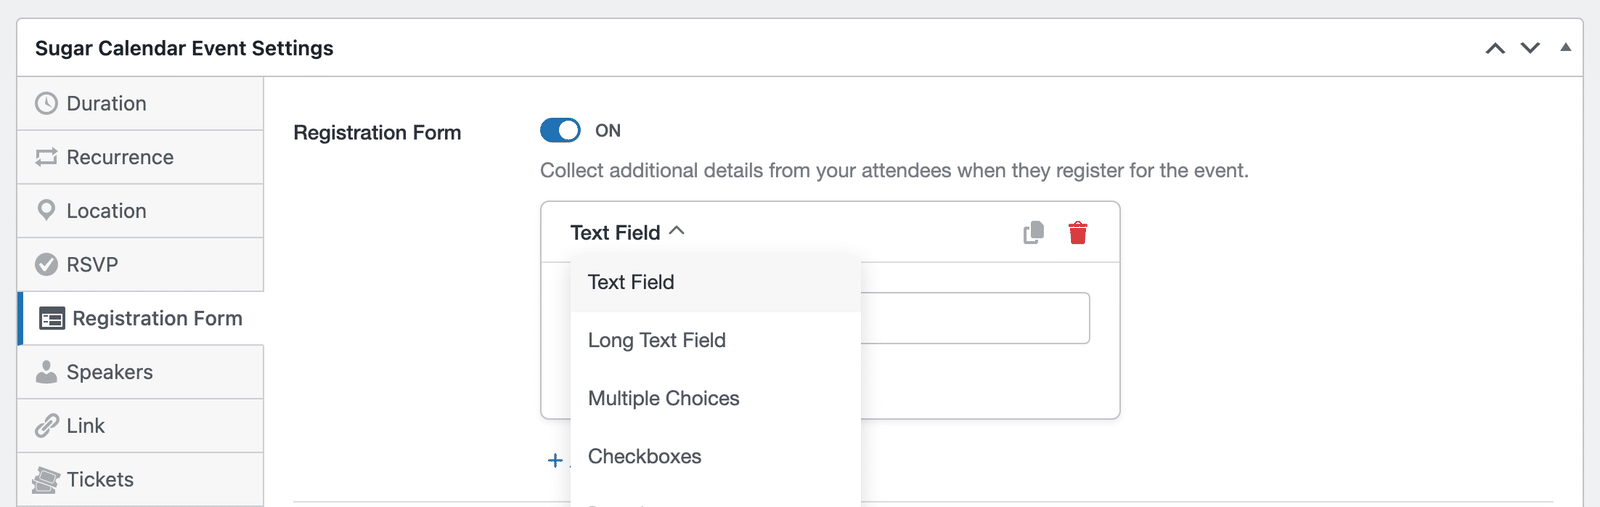
Sugar Calendar offers five field types:
- Text Field: Short free text answers, such as a job title or a dietary note
- Long Text Field: Longer answers that need a few sentences
- Multiple Choices: A set of radio options where the attendee picks exactly one
- Checkboxes: A set of options where the attendee picks as many as apply
- Dropdowns: A single-choice list, which keeps long option sets compact
Text fields accept any text, so they carry no format checking of their own.
Writing the Question Title
Every field needs a question title. Type it into the Add Question Title\* input in the body of the block. This is the wording your attendees read, so phrase it as a question or a clear instruction.
The title is not optional. Saving an event with a field that has no title stops the save, and Sugar Calendar shows “Please add a question title for this field” beneath the empty input.
Setting Up Answer Options
Multiple Choices, Checkboxes, and Dropdowns fields need answer options. Sugar Calendar seeds each one with three placeholders: First Choice, Second Choice, and Third Choice. Overwrite each placeholder with your own wording.
Every option row carries three controls. The handle on the left drags the row to a new position, the x button removes the row, and the + button adds another row directly below it. Below the last row sits an empty row labeled Add Option. Start typing in it to add a new option to the end of the list.
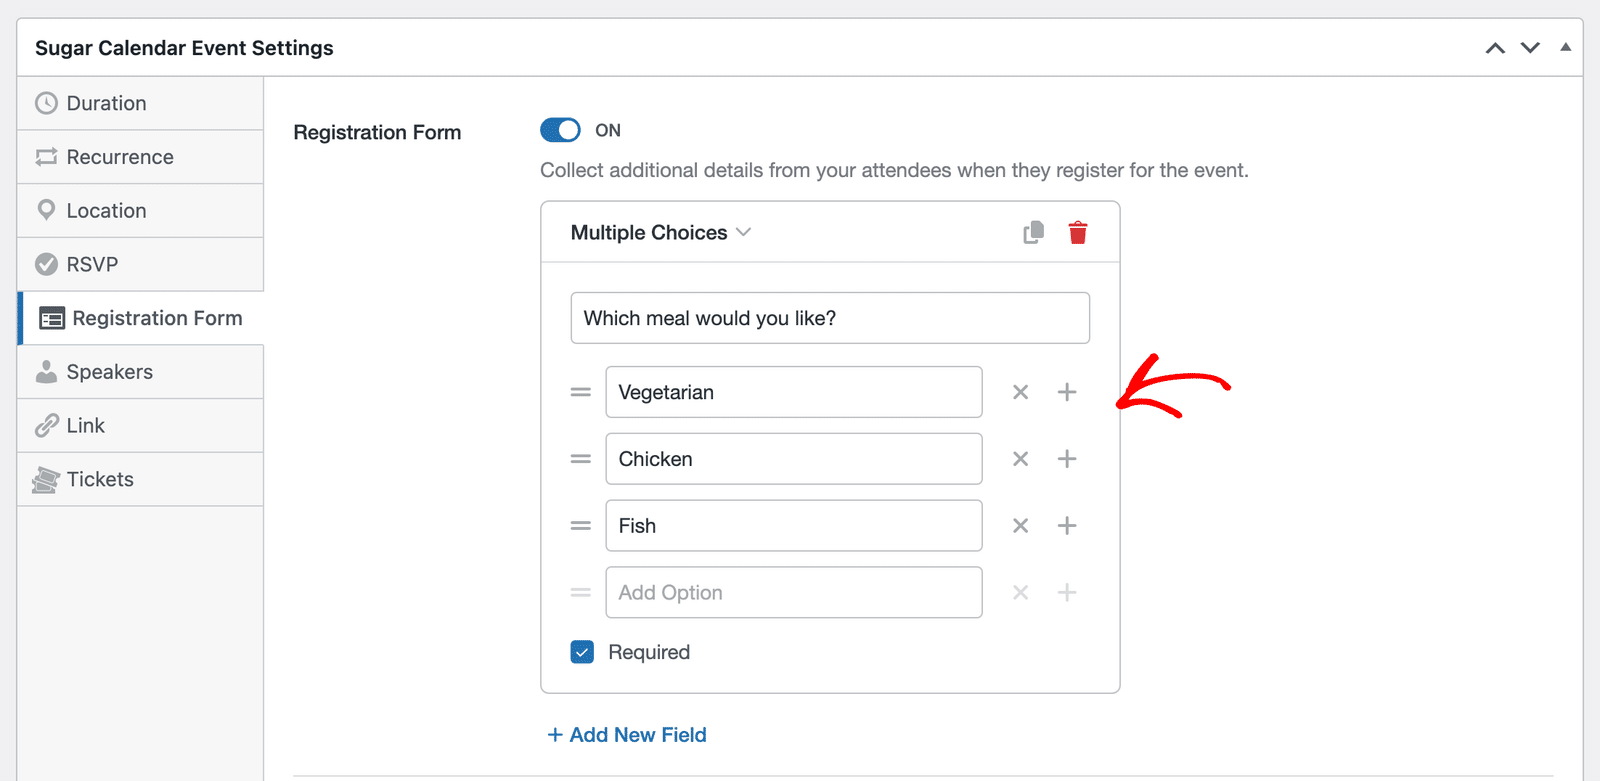
An options field with no options blocks the save as well, and Sugar Calendar shows “Please add at least one option for this field.”
Marking a Field as Required
Each field block carries a Required checkbox at the bottom, and Sugar Calendar ticks it for you on every new field. Leave it ticked when the answer matters, and clear it when the question is optional. Required fields show an asterisk to your attendees, and the form refuses to submit until they hold an answer.
Duplicating, Deleting, and Reordering Fields
The two icons at the top right of each block handle the housekeeping. The copy icon duplicates the field, including its options, and drops the copy directly below the original. The trash icon deletes the field.
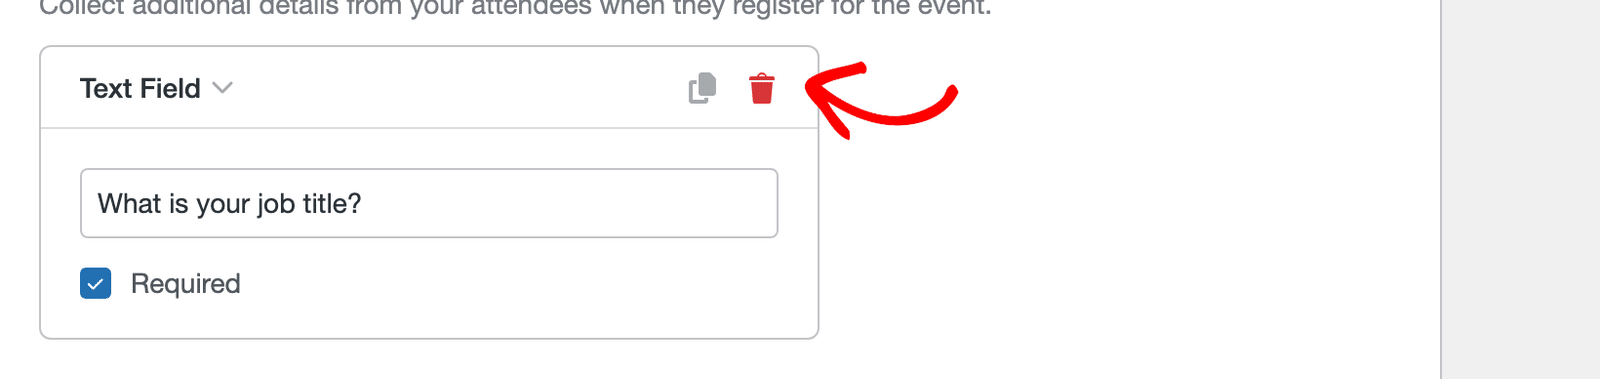
To change the order of your questions, drag a block by its header and drop it where you want it. The rest of the form moves out of the way as you drag.
Adding More Fields
Click Add New Field below the last block to add another question. Sugar Calendar adds it as a Text Field, so change the type if you need a different one.
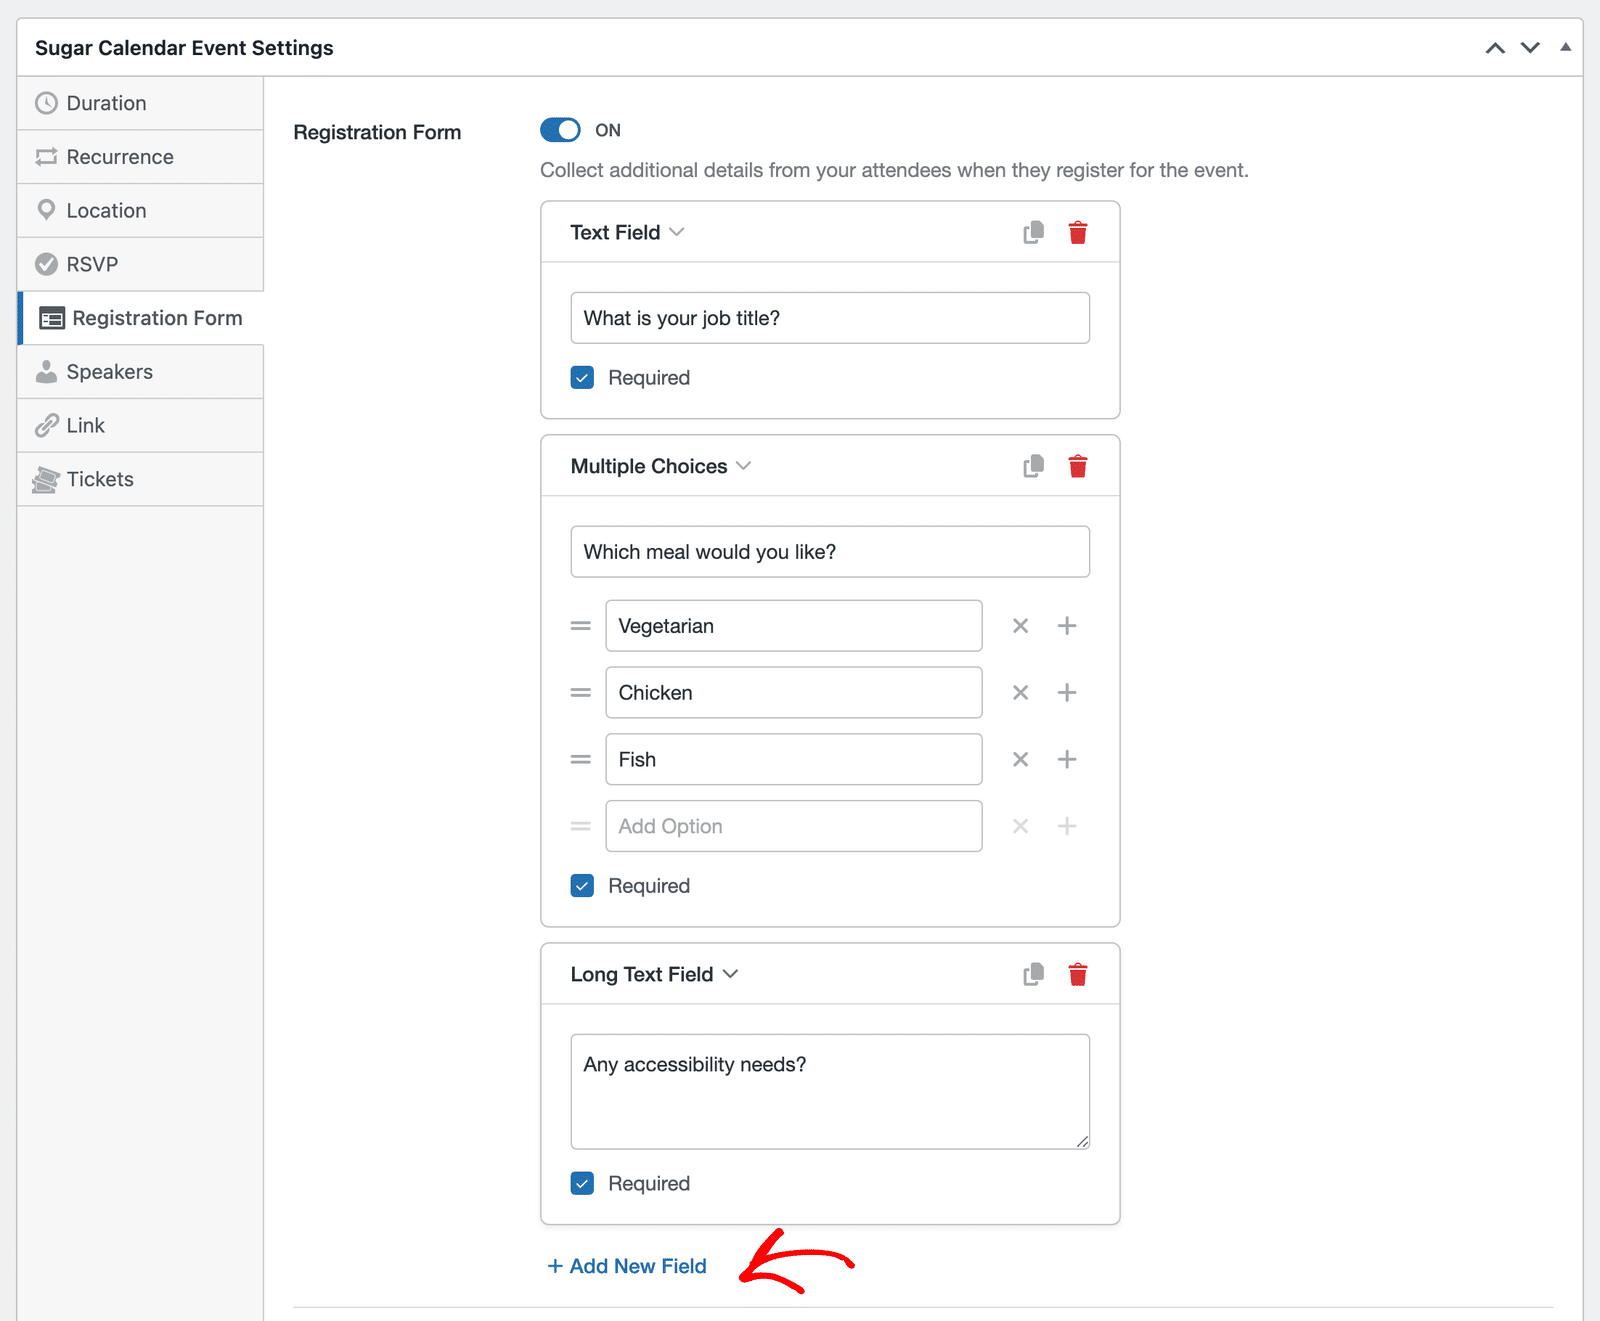
There is no limit on how many fields you add, or on how many options a field holds. Keep the list short anyway, because a long form gives people a reason to abandon their booking.
Note: If the event has neither ticket sales nor RSVP switched on, the editor shows this notice: “Heads up: attendees won’t see this form until you enable Tickets or RSVP for this event.” The buttons in that notice jump straight to the matching tab.
Choosing When Attendees Fill the Form
Below the divider, When to fill the form decides where the questions appear in the signup flow. The description reads “Specify when attendee must fill the form.”
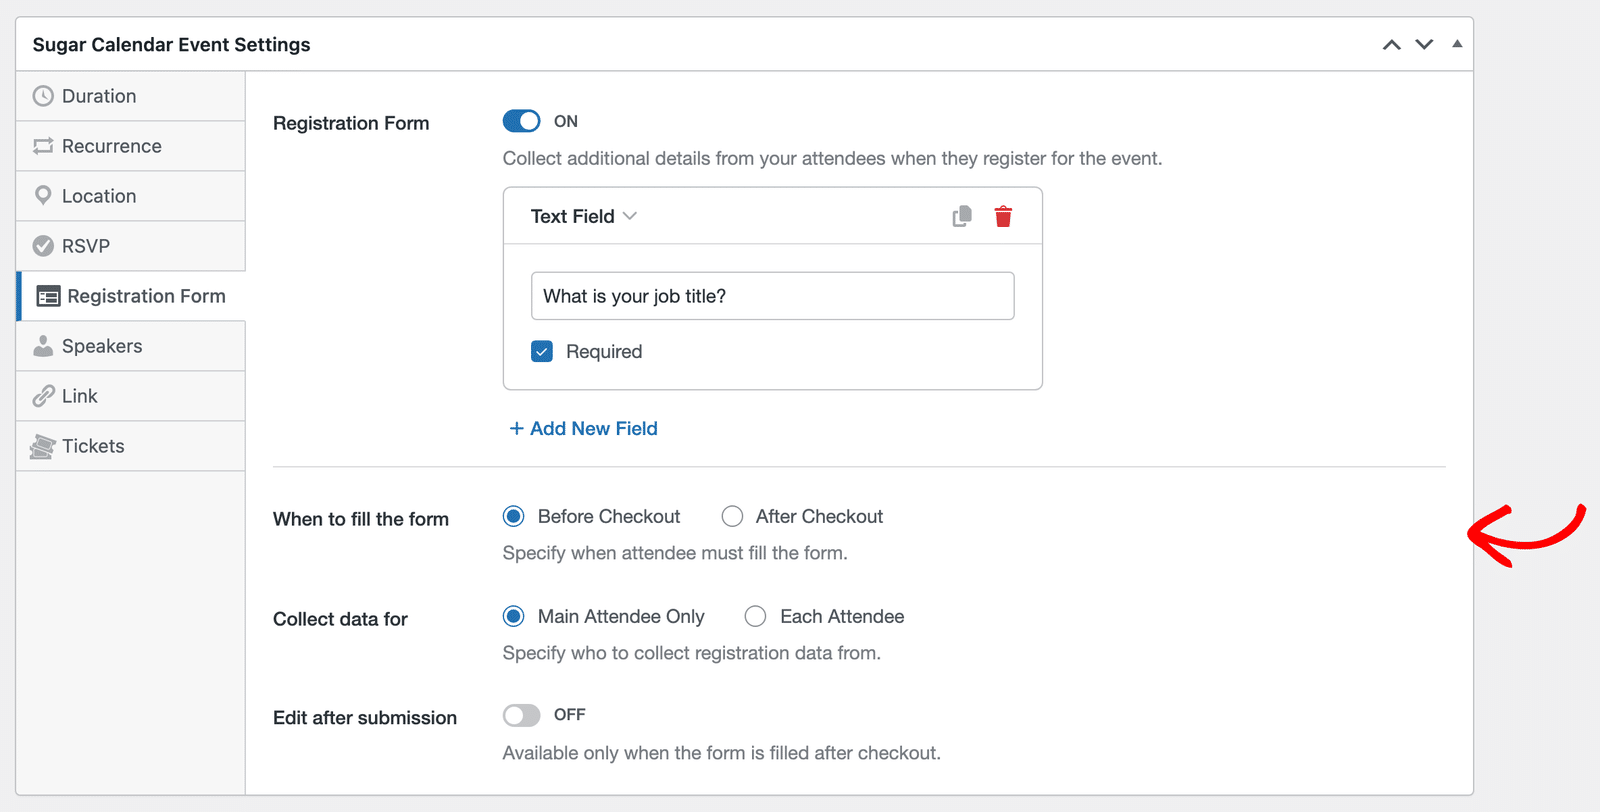
Pick one of two options:
- Before Checkout puts the questions in the signup flow itself, ahead of payment or confirmation. Sugar Calendar relabels the modal’s main button to Continue, and the attendee answers the questions before completing the booking. Because nobody reaches the payment step without answering, this is the option to choose when you truly need the data.
- After Checkout completes the booking first, then presents the questions. The attendee sees the success state, and the form opens as a modal on top of it. This keeps the purchase path as short as possible, at the cost of some people closing the modal before answering.
Sugar Calendar defaults to Before Checkout.
Choosing Who You Collect Details From
Collect data for decides how many copies of the form each booking produces. The description reads “Specify who to collect registration data from.”
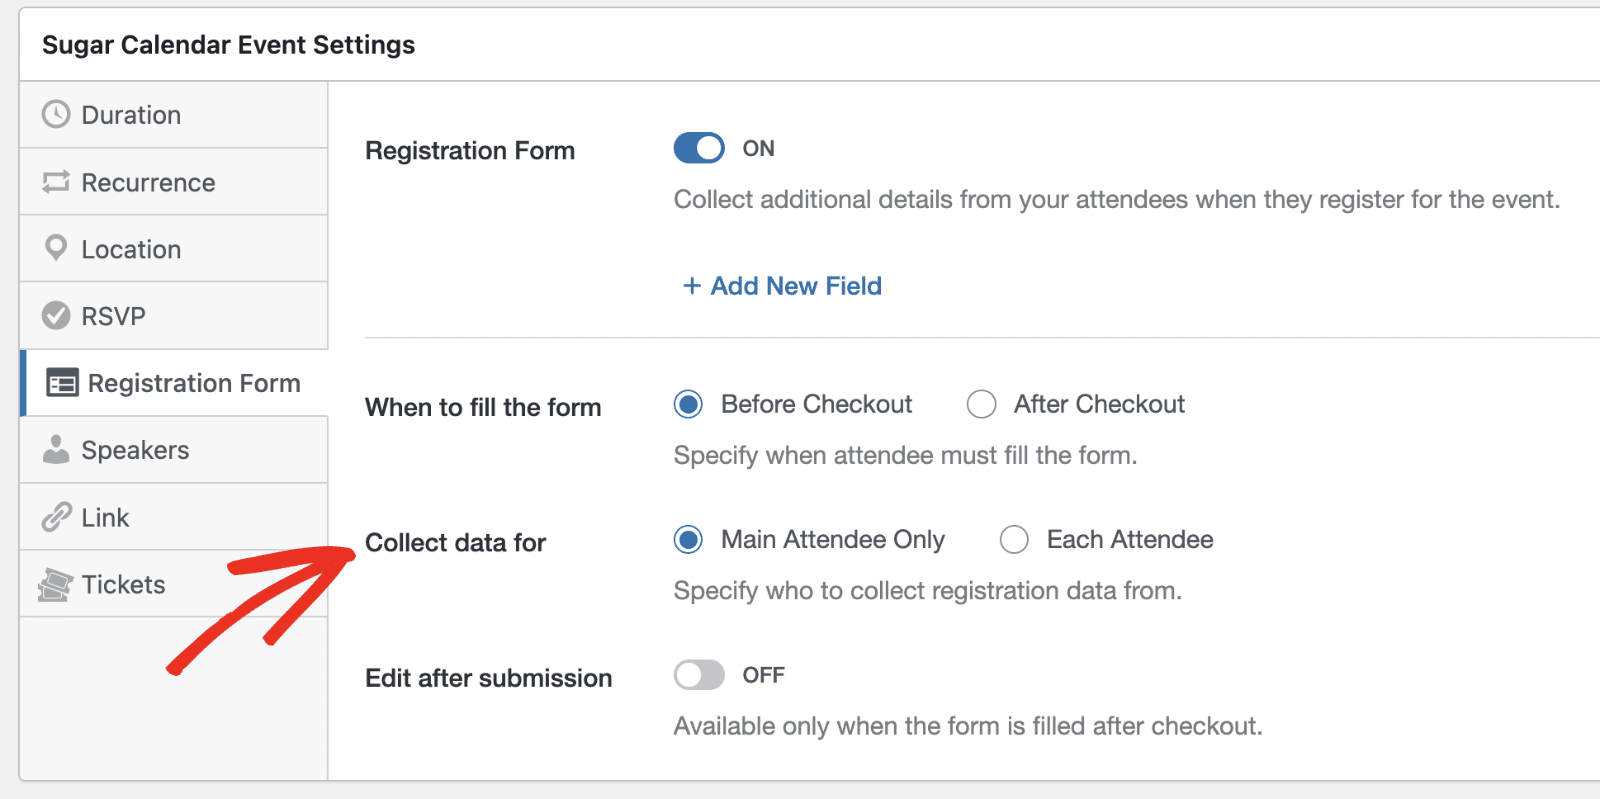
- Main Attendee Only asks the questions once, of the person making the booking. Choose this for details that describe the booking as a whole, such as a company name.
- Each Attendee asks the questions once per person on the booking. Choose this for details that differ from person to person, such as a meal choice.
Sugar Calendar defaults to Main Attendee Only.
Collecting Details for Specific Ticket Types
When you select Each Attendee on an event that sells tickets, a Collect for ticket type setting appears.
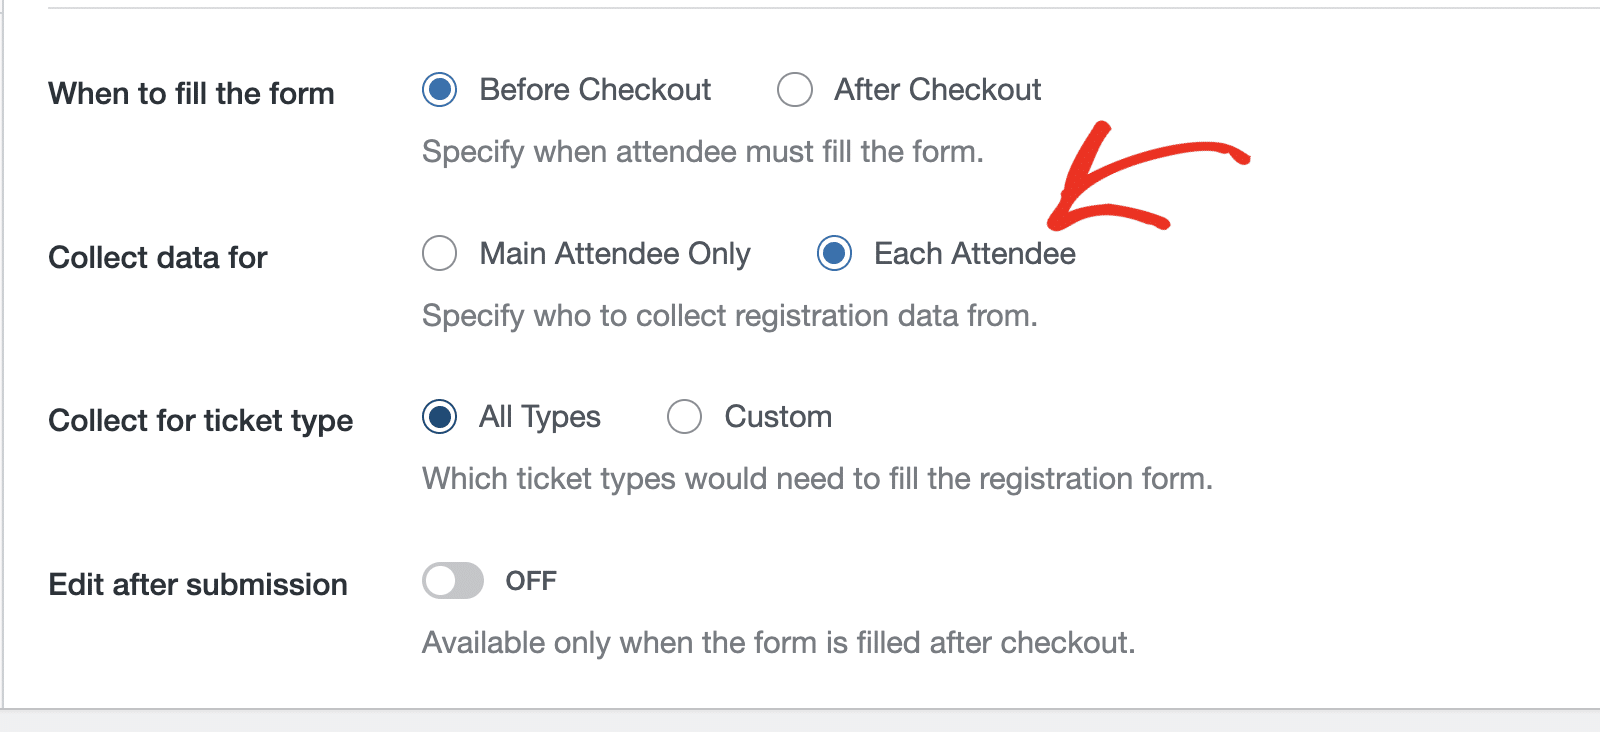
This setting is where you skip the ticket types that do not need the questions. A workshop add-on ticket might need a session choice, for example, while a free general admission ticket needs nothing.
Leave the radio on All Types to ask everyone. Select Custom to reveal the Select ticket types selector, then choose the types you want. Choosing Custom without picking a type blocks the save, and Sugar Calendar shows “Please select at least one ticket type.”
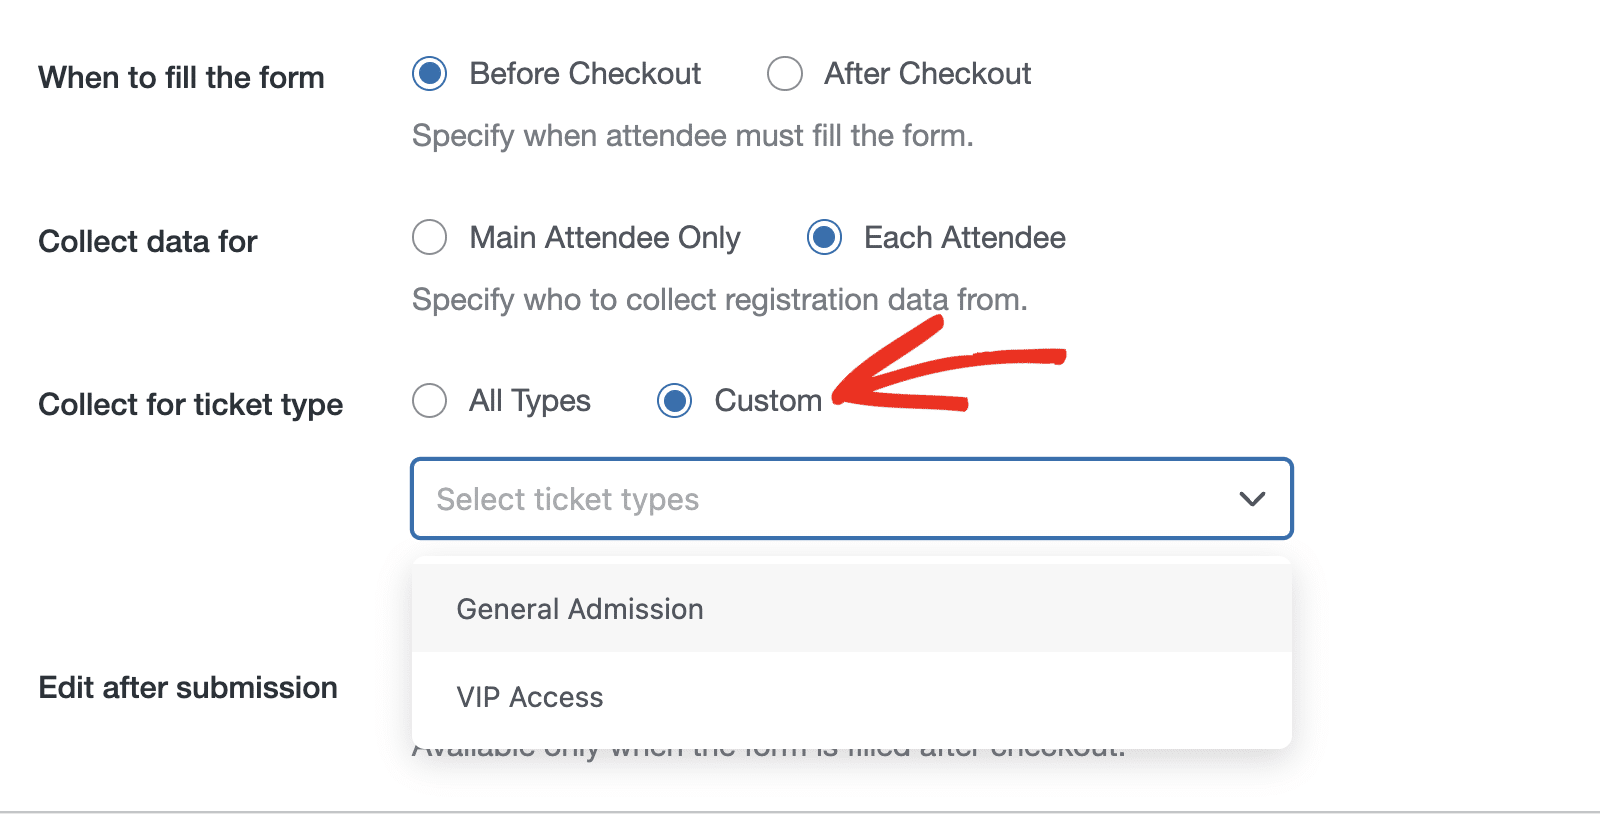
The All Types and Custom radios appear only when the event has more than one ticket type. With a single type there is nothing to target, so the row reads “Multiple tickets not found” and offers a link to add more tickets on the Tickets tab. If you add a ticket type without saving the event, the row asks you to update the event first.
Ticket-type targeting does not apply to RSVP events, because RSVP has no ticket types.
Letting Attendees Edit Their Answers
The last setting, Edit after submission, controls whether attendees return to change what they submitted. The description reads “Allow attendees to edit forms post-submission”.
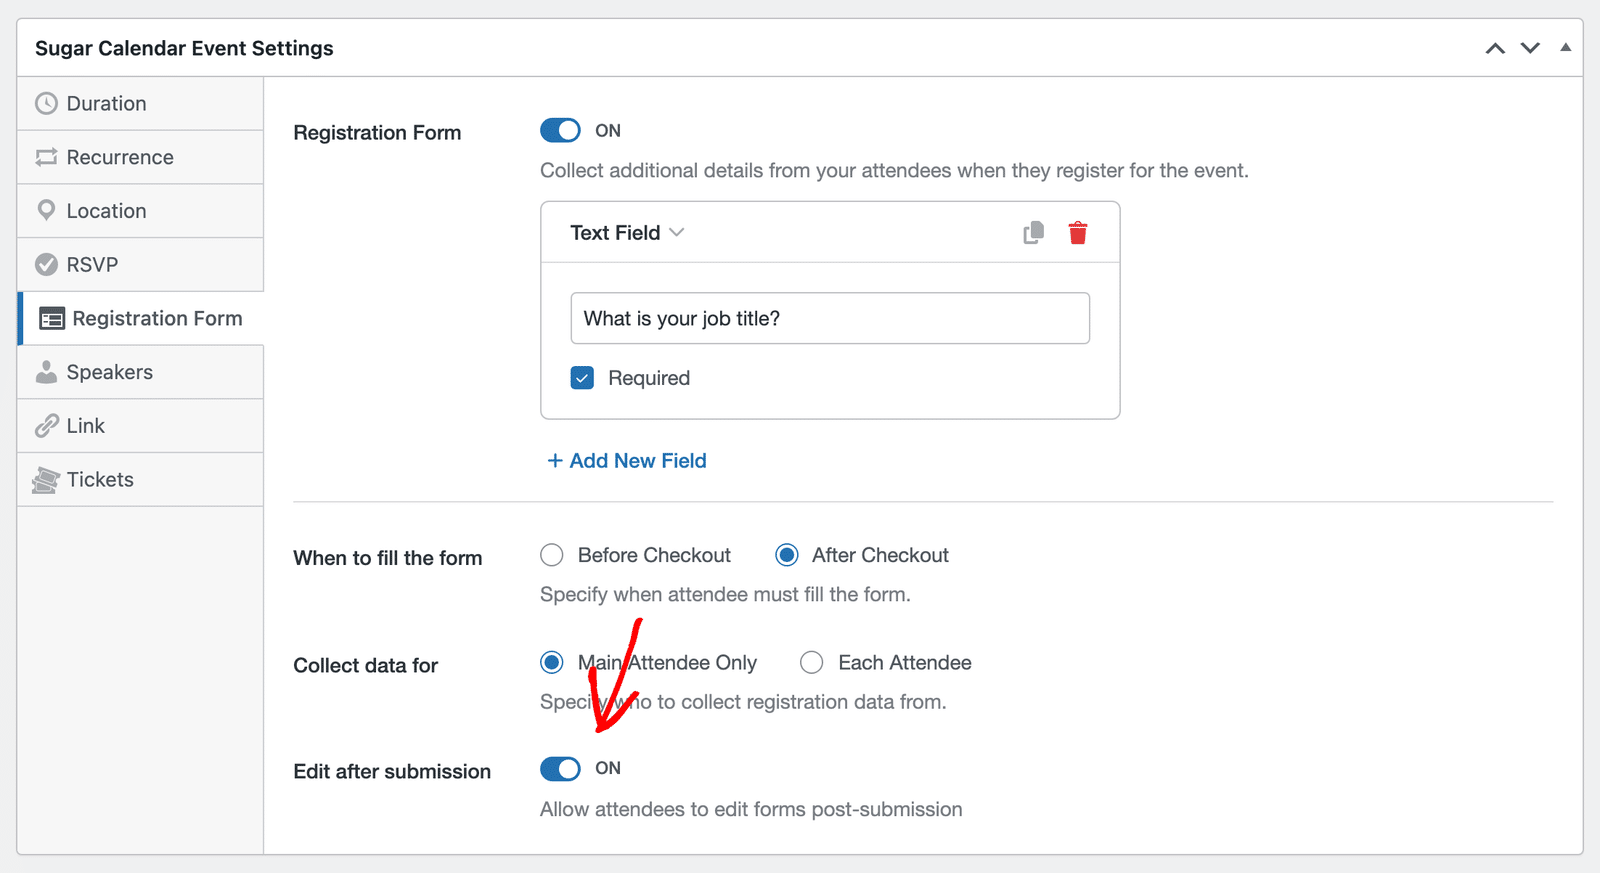
When enabled, the registration confirmation email carries a private link back to the form. A user opens the link, sees their answers under the heading Edit Your Registration, changes what they need to, and clicks Save Edits.
When you finish, click Update to save the event along with its form. If any field is incomplete, Sugar Calendar refuses the save and shows “Registration Form has incomplete fields. Please review the Registration Form tab before saving.” along with a Review Form button that takes you back to the tab.
What Your Attendees See
On a Before Checkout Form
The attendee picks tickets as usual, then clicks Continue instead of the normal purchase button.
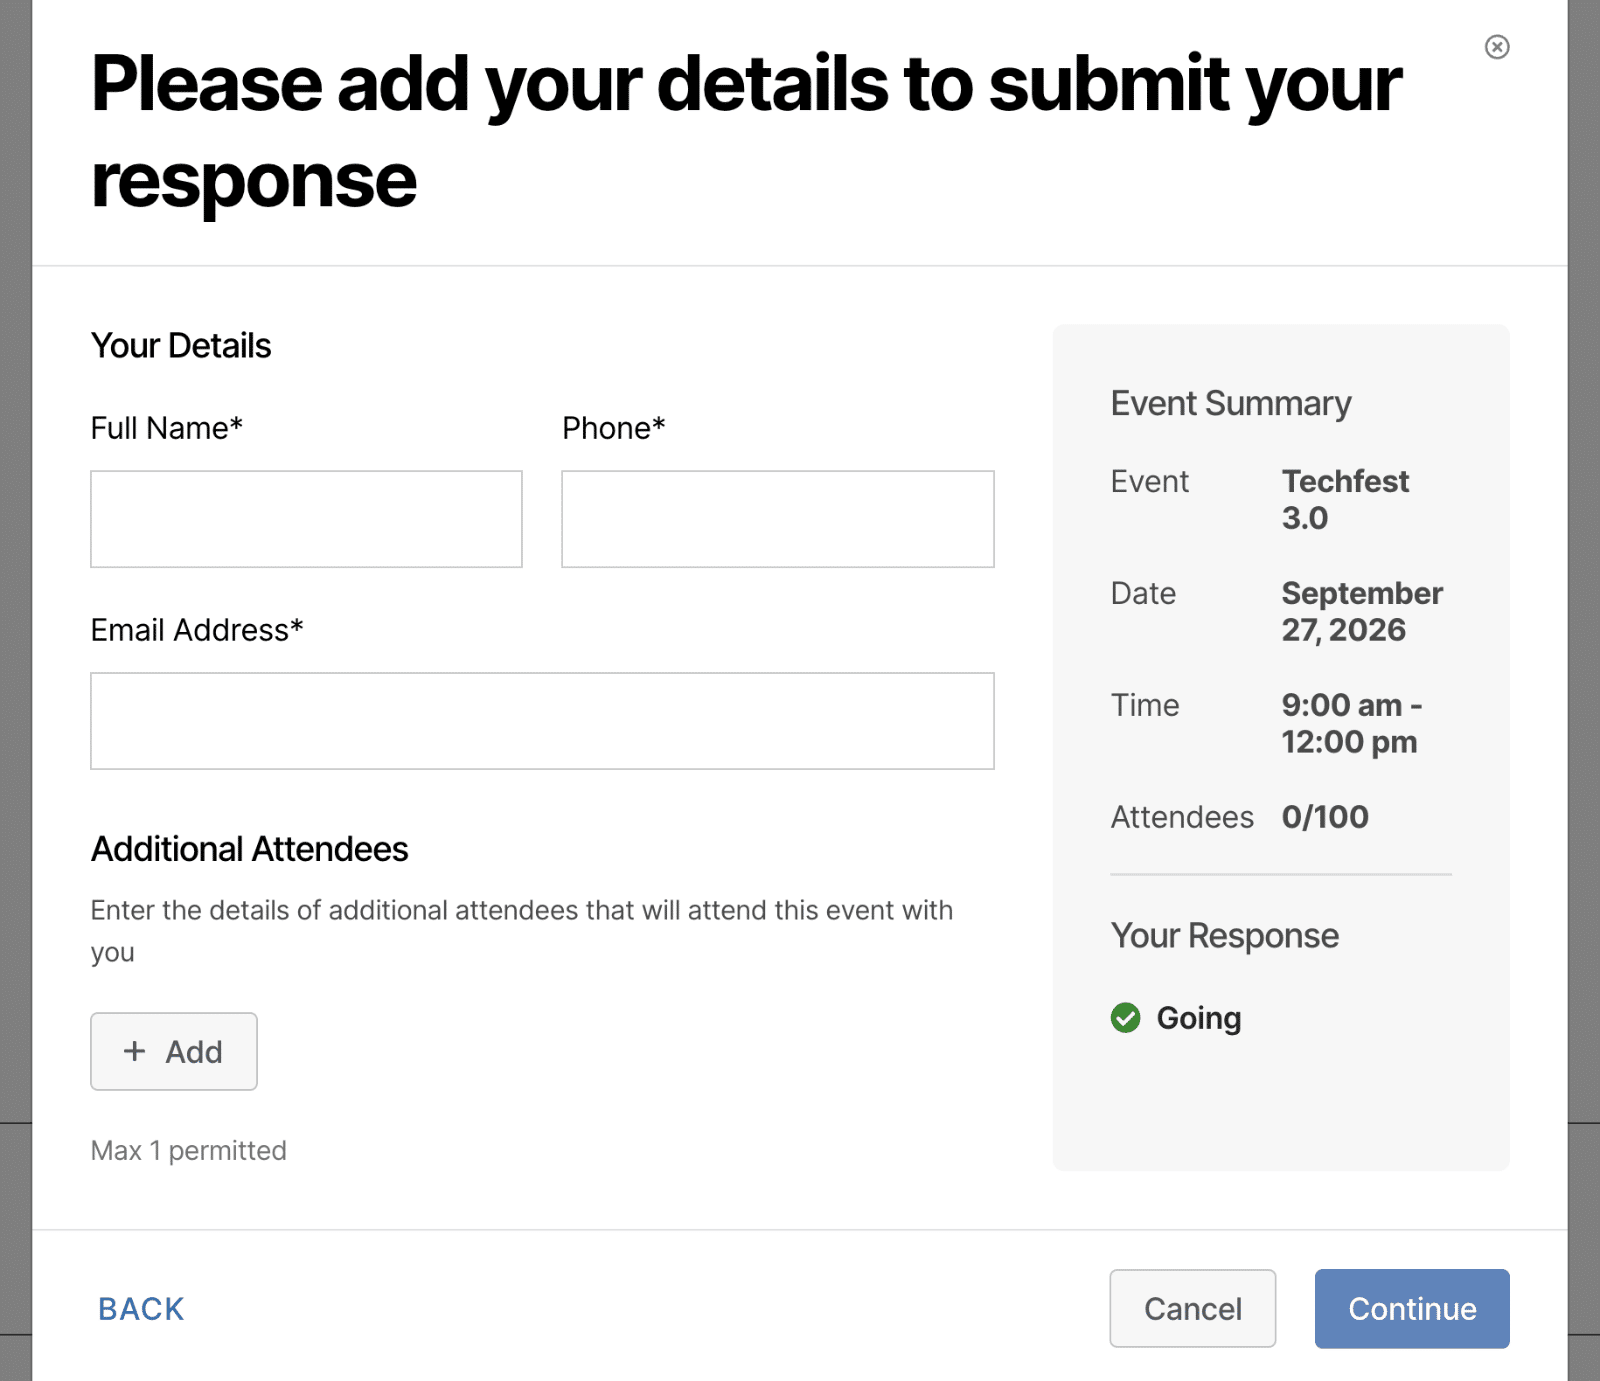
The questions open under the heading Additional Details for Attendees.
With Each Attendee selected, every person on the booking gets a collapsible block headed by their name and their ticket type. The first block starts open, and each block except the last carries a Next Attendee button that closes it and opens the following one.
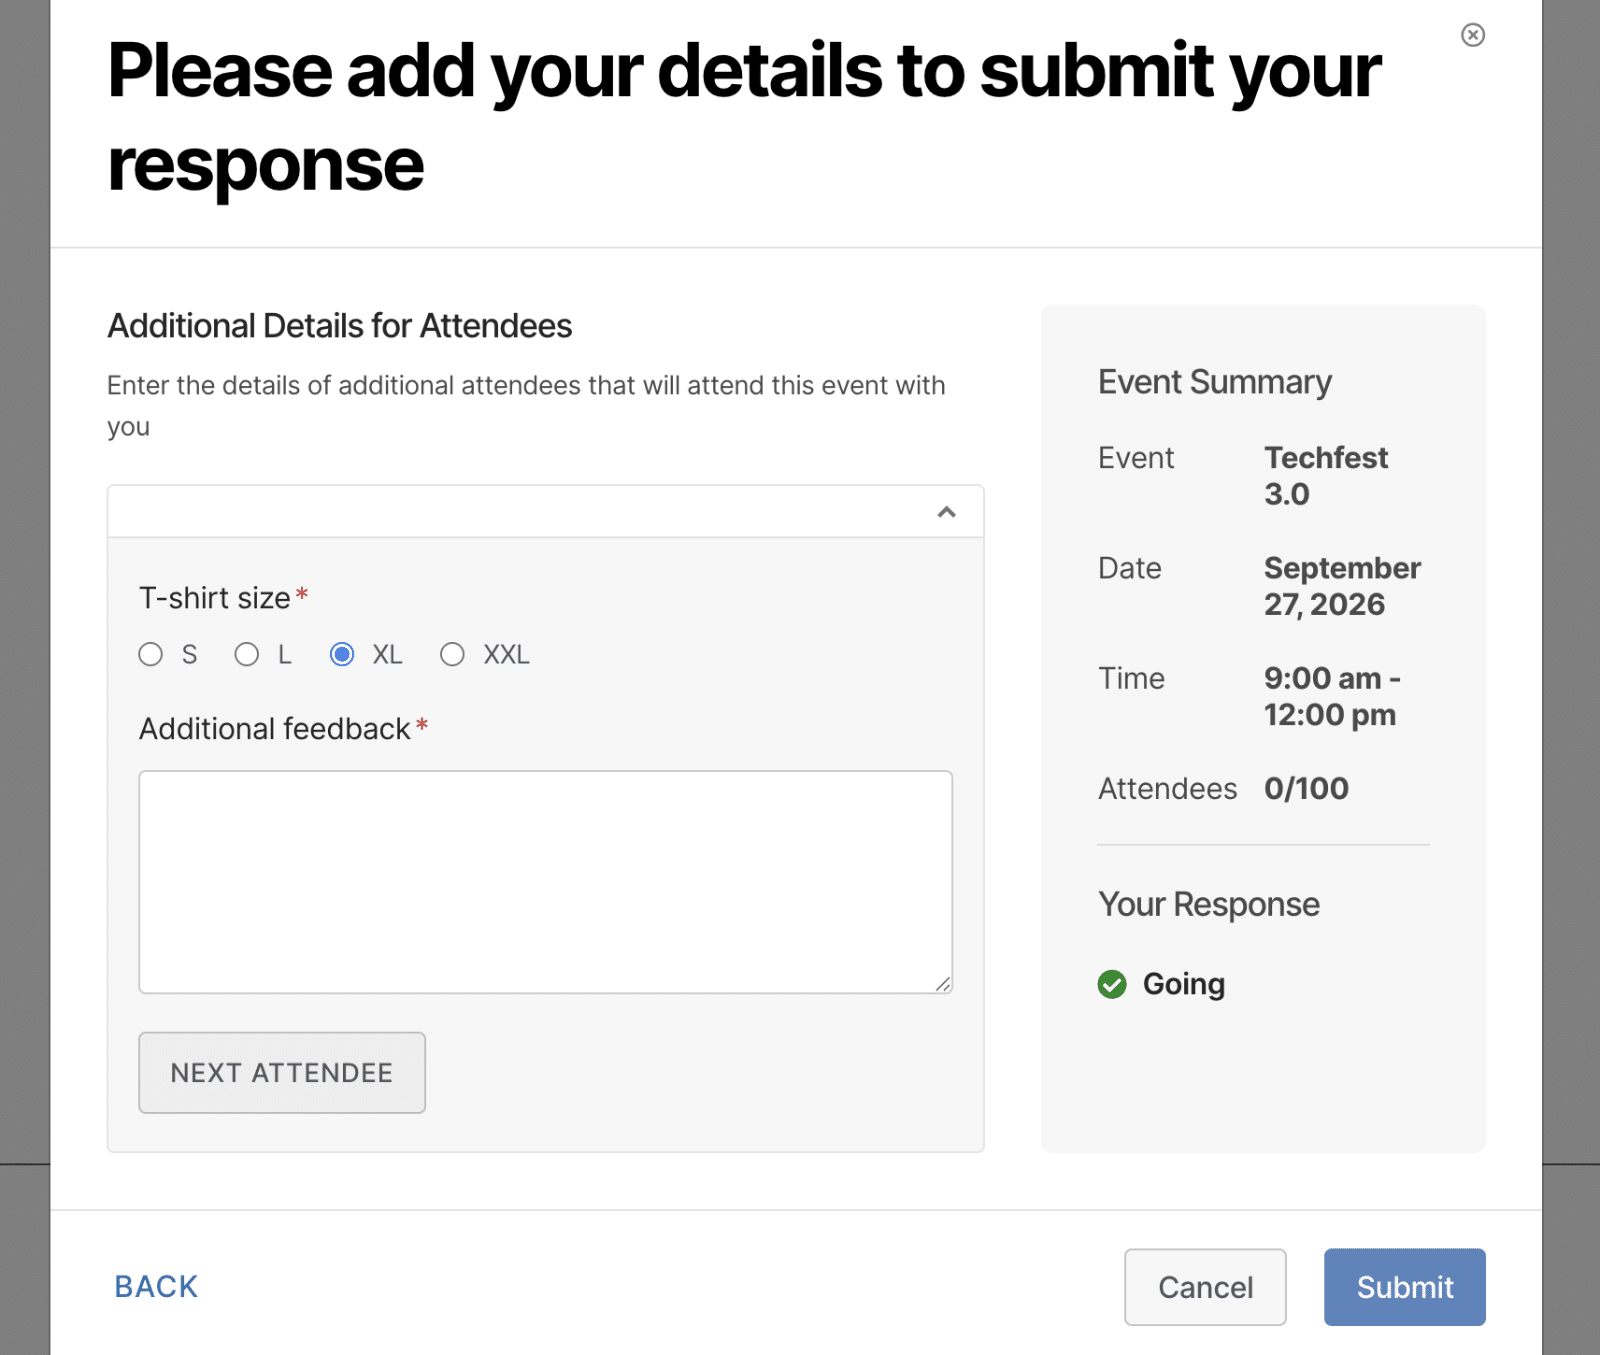
Required questions carry an asterisk. Submitting with one of them empty shows “This field is required.” next to the question, and Sugar Calendar expands the collapsed attendee block holding it so the attendee sees exactly what is missing.
On an After Checkout Form
The attendee completes the booking first and sees the success state, headed Your Order was Successful! for a ticket purchase. The questions then open in a modal headed Complete Your Registration, alongside a summary of the event and the order.
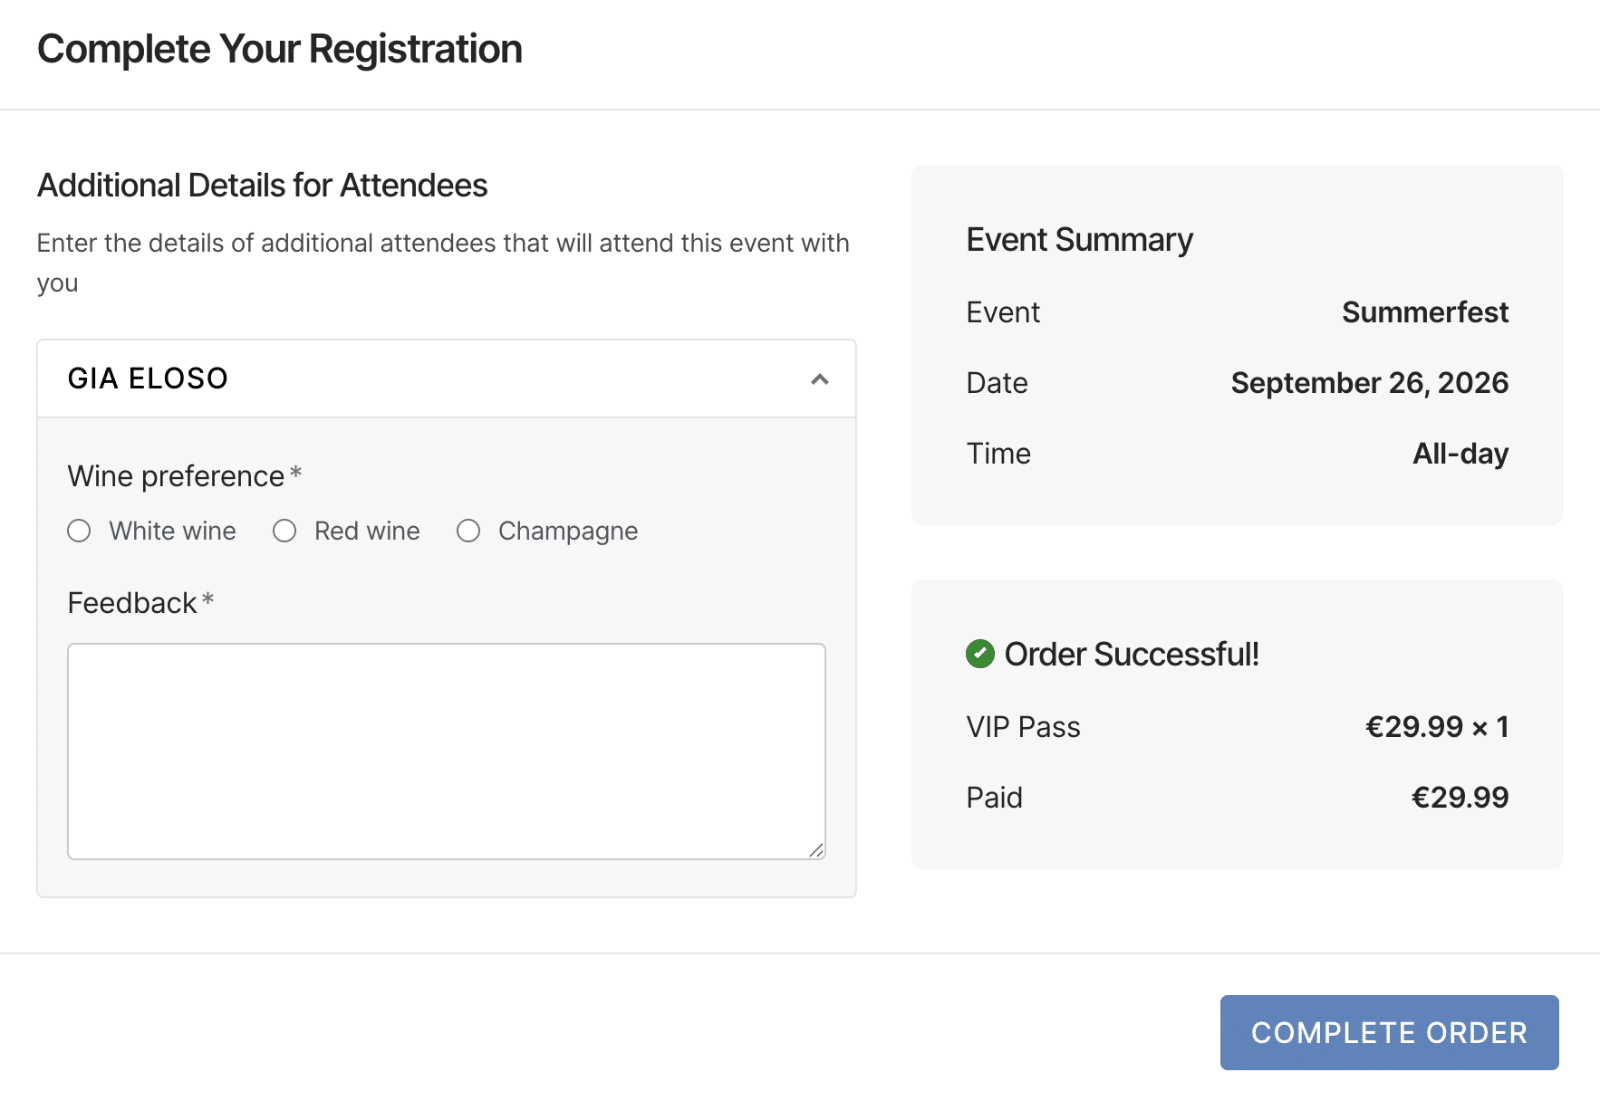
The modal has no dismiss control, so the attendee either answers the questions or leaves the page. Submitting shows Your Registration was Successful! with the line “We will soon send an email confirmation to all attendees” and a Close button.
Anyone who leaves without answering has not lost the chance. Their ticket receipt email carries a Complete your registration block explaining that “The event organiser has a few more questions about your booking,” with an Answer them here link straight back to the form.
On an RSVP Event
RSVP events work the same way, with one difference: the form appears only for people who respond that they are attending. Anyone declining skips it. RSVP has no ticket types, so the attendee blocks show names alone.
Where the Responses Land
On an Order
Go to Events » Tickets and open the Orders tab, then click the order you want to review. Registration answers appear in their own panels on the order page.
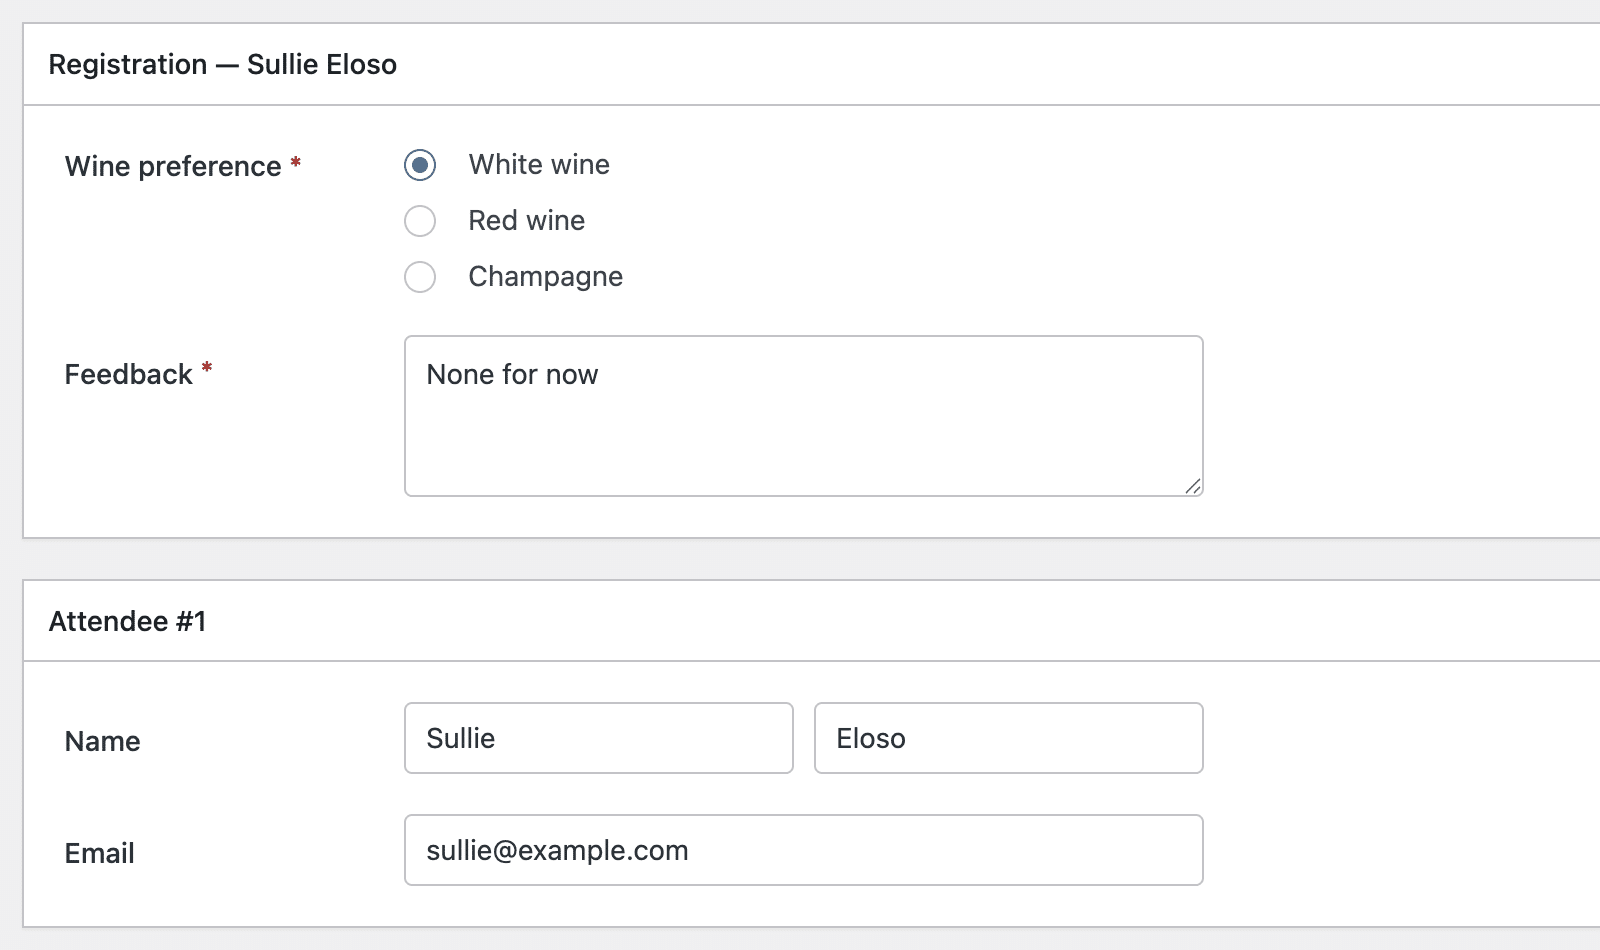
Which panels you see follows the setting you chose. Main Attendee Only produces one panel headed Registration followed by the purchaser’s name. Each Attendee produces one panel per person, headed Attendee #1, Attendee #2, and so on. Answers left over from a person you removed from the order sit in a panel of their own, so nothing goes missing.
Every answer is editable. Change what you need to and click Update. Each ticket row in the Tickets panel also carries an Edit link that jumps to that attendee’s panel.
On an RSVP
Open Events » RSVP and edit the response you want to review.
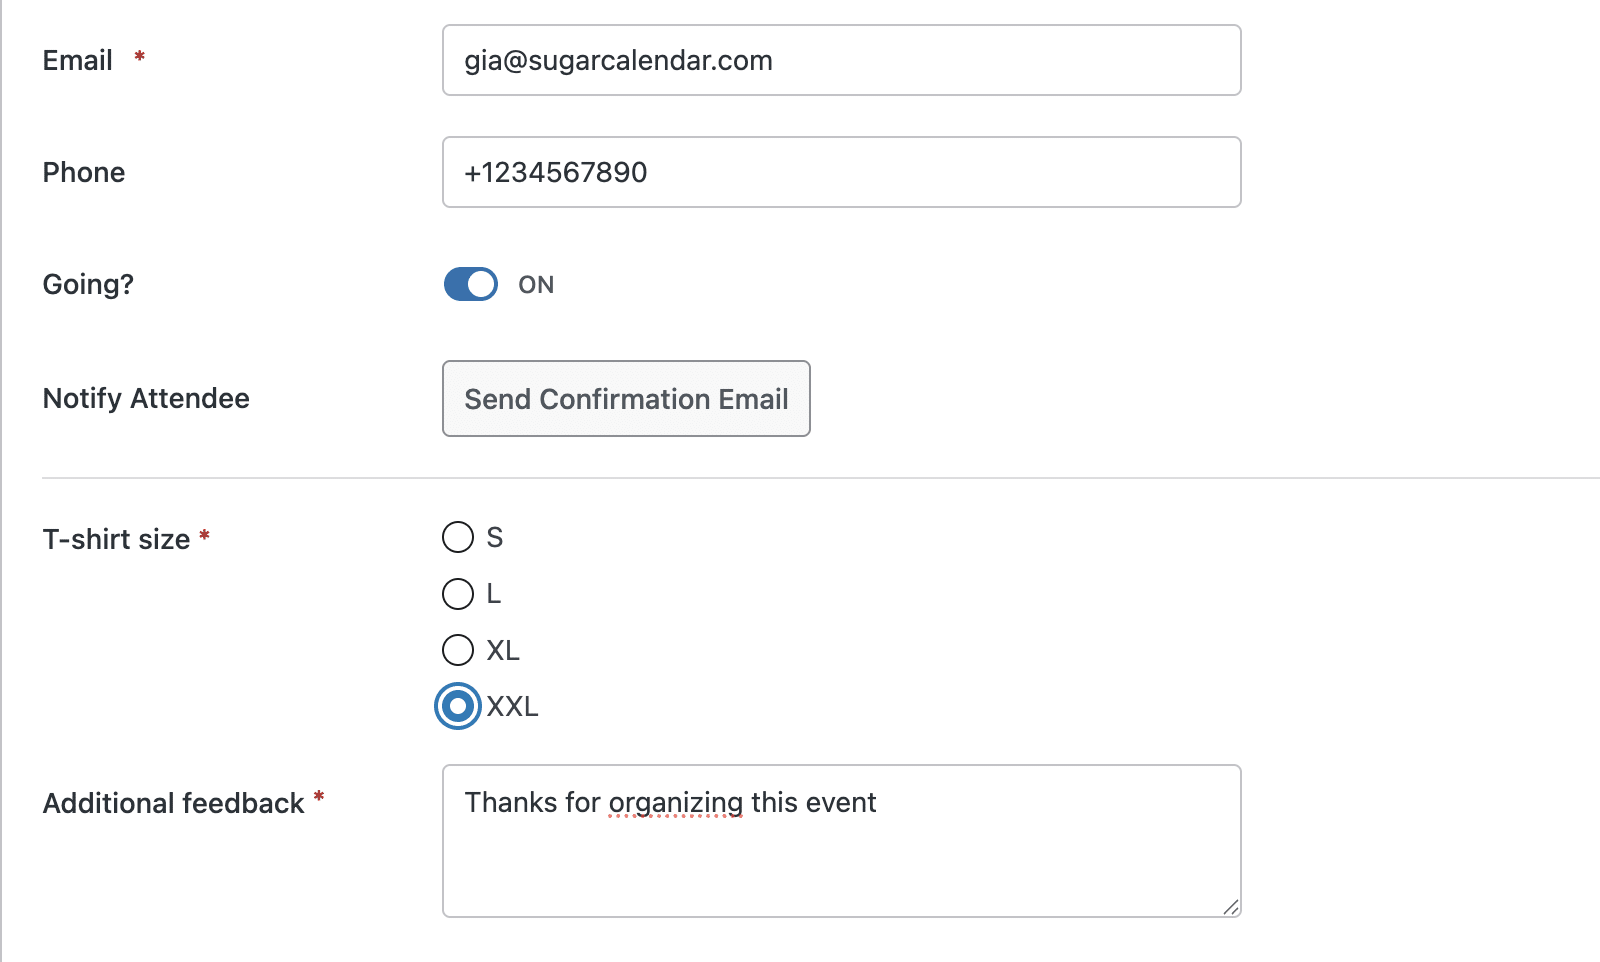
Each attendee’s registration answers appear inside that attendee’s own panel, alongside their name and contact details, and they are editable there in the same way.
In Your Emails
Sugar Calendar adds two emails for registration forms, and both belong to After Checkout forms. Go to Events » Settings and open the Emails tab to find them in the Configure Emails to Attendees list.
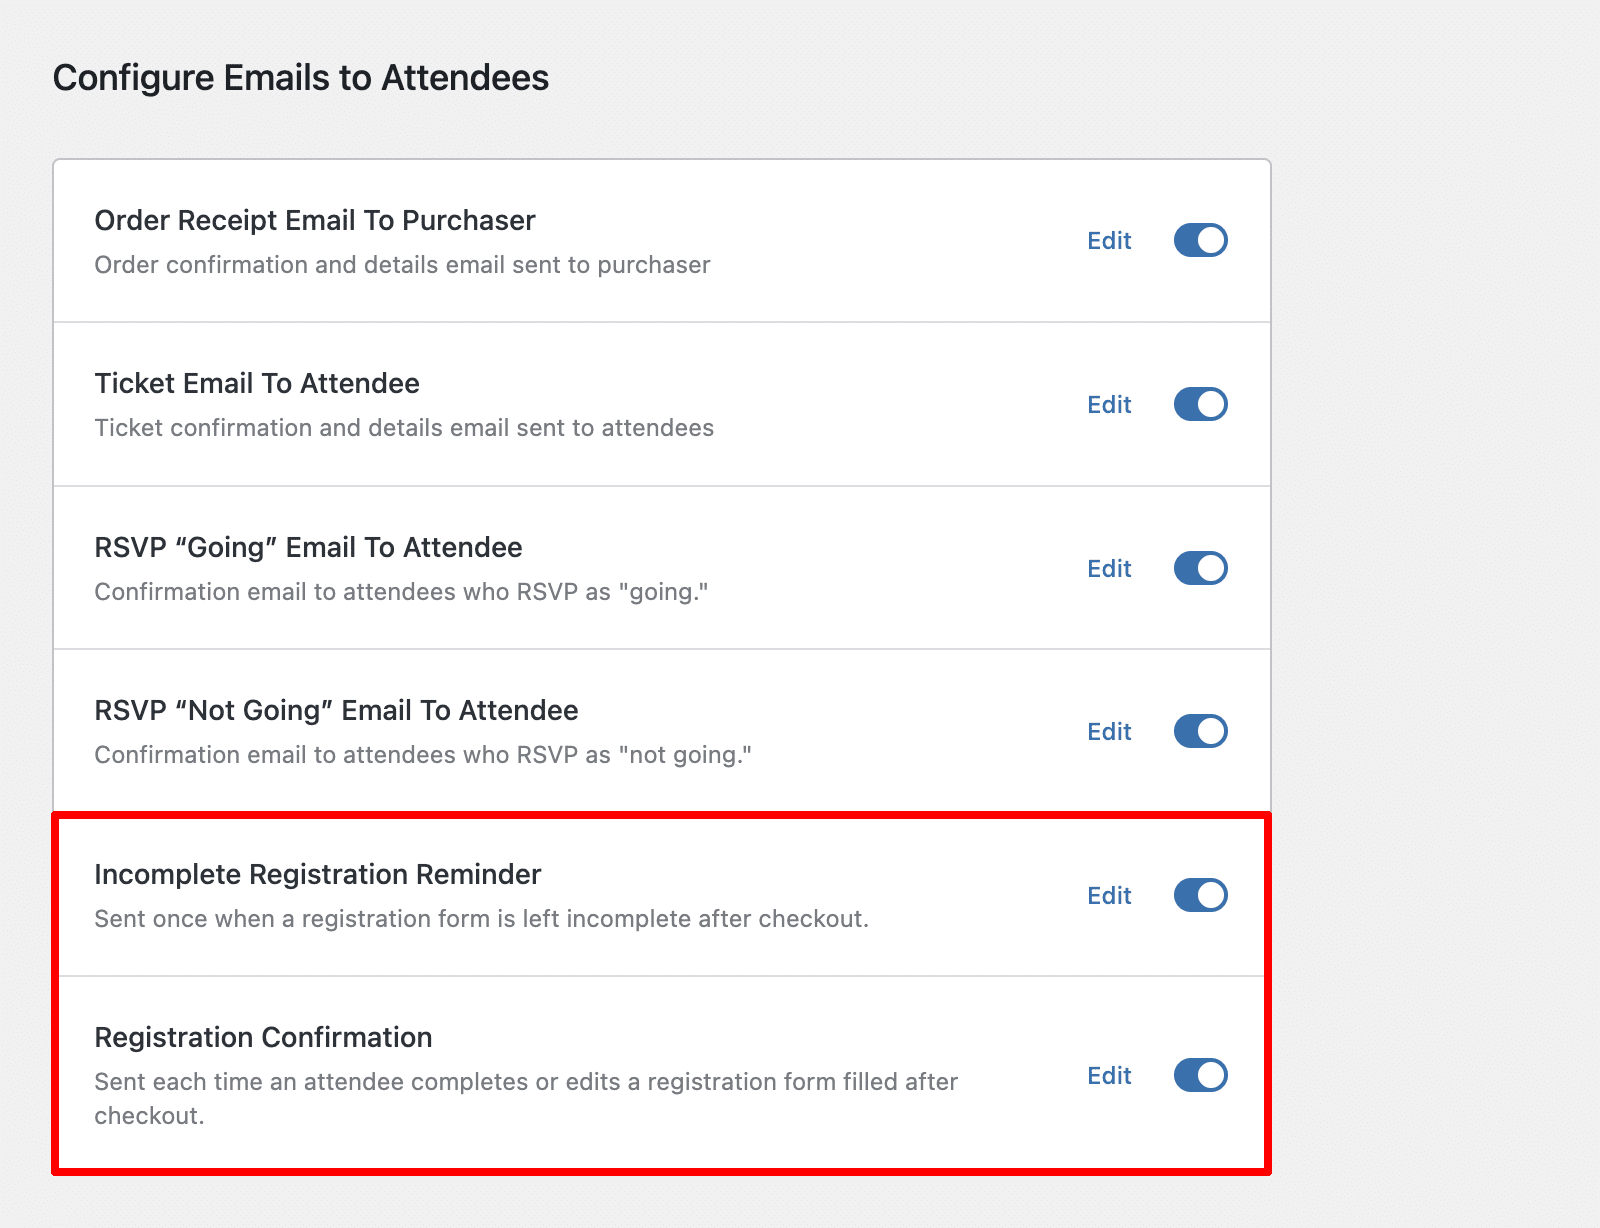
- Incomplete Registration Reminder goes out once, about an hour after an attendee leaves a form incomplete, prompting the attendee to finish. Its default subject reads “Please complete your registration for {event_title}.”
- Registration Confirmation goes out each time an attendee completes or edits a form filled after checkout. Its default subject reads “Your registration for {event_title} is confirmed.”
Click either email to rewrite its subject and message. Both support the {attendee_name}, {event_title}, {event_date}, and {site_name} placeholders.
The reminder adds {resume_link} for the link back to the form, and the confirmation adds {edit_link}, which fills in only when the event allows editing. When you switch editing off, Sugar Calendar drops the line carrying {edit_link} rather than leaving a dead invitation in the message.
Frequently Asked Questions
Below, we’ve answered some of the most common questions about registration forms in Sugar Calendar Events.
Is there a limit to how many fields I can add?
No. Add as many fields as you need, with as many options each as you need. Long forms cost you bookings, though, so ask only what you will act on.
Does the registration form work with RSVP events?
Yes. The form works for ticketed events and RSVP events alike. On an RSVP event it appears only for people responding that they are attending, and the ticket-type setting does not apply, because RSVP has no ticket types.
Can attendees edit their responses after submitting?
Yes, when you allow it. Switch on Edit after submission and the confirmation email carries a link back to the form, where the attendee changes their answers and clicks Save Edits. The setting works only on After Checkout forms. Leave it off and the answers are final once the attendee submits them, and only you can change them from the order or the RSVP.
Why don’t my attendees see the form?
Check three things. Switch the Registration Form toggle to On, turn on either ticket sales or RSVP for the event, and give every field a question title, since an incomplete field stops the event from saving. If the event routes purchases through WooCommerce, registration forms do not apply at all.
That’s it! You now know how to create a registration form for your events in Sugar Calendar.
Would you like to see how registration forms fit alongside the rest of your event setup? Check out our complete guide to event management for the full picture.